Integrating Flyway with Aurora Serverless and AWS Fargate - Part 2 - Working with Flyway

Contents
Understanding Flyway
With our database set up in the previous section, we are ready to actually do something with it so we can store some data. To accomplish this, we will be using Flyway. Flyway helps manage database state and code by using migrations. A migration is just any piece of code to be applied to the database, Flyway currently supports SQL and Java based migrations. Flyway Teams edition also supports script-based migrations. For the purposes of this tutorial we will just be using SQL migrations.
Flyway works to manage database migrations using seven commands. These commands are Migrate, Clean, Info, Validate, Undo, Baseline and Repair. To find out more about these commands, click here. For our purposes we will only be using Migrate and Info.
Before we download and use Flyway, let’s go over how it works for a moment. Flyway uses a schema history table to keep track of which migrations have been applied. This table will automatically be created as flyway_schema_history if it does not exist. Using the Migrate command will cause Flyway to search the file system for migrations to apply to the database. There are two kinds of migrations: Versioned and Repeatable. Pending versioned migrations are always applied before pending repeatable migrations.
Versioned migrations have a version, description, and checksum. The version and description are specified in the file name in the following format:
V<version_number>__<description>.sql

Ex: V1.0.0__CreateSampleTable.sql
Versioned migrations are applied in increasing order and added to the schema history table. Once a version has been applied, any subsequent versions to be applied must be higher than the previous version. Attempting to add a version that is lower than the highest applied version will result in a validation error with Flyway and the migration will not be run. The checksum for the versioned migration file is also stored in the schema history table. This checksum is used to make sure that once a versioned migration has been applied the file stays the same and there are no accidental changes.
Repeatable migrations have a description and checksum, but no version number. They are applied every time their checksum changes. In other words anytime the migration file is edited. Repeatable migrations are good for things such as stored procedures or views that might be modified more often. This means that a repeatable migration should always be able to be run repeatedly without any conflicts. This often means using syntax like DELETE ...; CREATE ...; or CREATE OR REPLACE. The file name format for repeatable migrations is:
R__<description>.sql

Ex: R__InsertIntoSampleTable_p.sql
To learn more about migrations, click here.
One final Flyway tool we will be using is Placeholder replacement. In our migrations we can use placeholders by placing them in between braces with this format:
${myplaceholder}
We can then supply the value of the placeholder when running our migration by adding the configuration option:
-placeholders.myplaceholder=somevalue
This can be useful to specify environment specific values or pass in passwords that you don’t want to hard-code.
Sample Flyway Migration Code
In order to demostrate how to use Flyway, I’ll provide some sample migration files. These files will create a read_only user, create a table called sample, create a user called sample_application, and create a stored procedure insert_sample_p that is only able to be used by sample_application or sqladmin.
Create a folder called sql/ and add the following migration files:
V1.0.0__CreateReadOnlyUser.sql:
CREATE USER read_only WITH ENCRYPTED PASSWORD '${READ_ONLY_PASSWORD}';
GRANT CONNECT ON DATABASE ${DATABASE_NAME} to read_only;

-- Grant select privileges to read_only user for existing tables and sequences
GRANT USAGE ON SCHEMA public TO read_only;
GRANT SELECT ON ALL SEQUENCES IN SCHEMA public TO read_only;
GRANT SELECT ON ALL TABLES IN SCHEMA public to read_only;

-- Set default privileges to grant select to read_only for any new tables created
ALTER DEFAULT PRIVILEGES IN SCHEMA public
    GRANT SELECT ON TABLES TO read_only;
V1.0.1__CreateSampleTable.sql:
CREATE TABLE sample (
    id SERIAL PRIMARY KEY,
    message VARCHAR
);
V1.0.2__CreateSampleApplicationUser.sql
CREATE USER sample_application
WITH LOGIN PASSWORD '${SAMPLE_APPLICATION_PASSWORD}';

GRANT CONNECT ON DATABASE ${DATABASE_NAME} to sample_application;

REVOKE ALL PRIVILEGES ON DATABASE ${DATABASE_NAME}
FROM sample_application;
REVOKE ALL PRIVILEGES ON ALL TABLES IN SCHEMA public
FROM sample_application;
REVOKE ALL PRIVILEGES ON ALL FUNCTIONS IN SCHEMA public
FROM sample_application;
REVOKE ALL PRIVILEGES ON ALL SEQUENCES IN SCHEMA public
FROM sample_application;

GRANT USAGE ON SCHEMA public TO sample_application;
R__InsertSample_p.sql
-- I use DROP then CREATE instead of CREATE OR REPLACE
-- CREATE OR REPLACE only works if the function signature remains the same
DROP FUNCTION IF EXISTS insert_sample_p;
CREATE FUNCTION insert_sample_p (
    input_message VARCHAR
)
RETURNS INT AS $$
DECLARE
    sample_id INT;
BEGIN
    INSERT INTO sample (
        message
    )
    VALUES (
        input_message
    )
    RETURNING id INTO sample_id;

    RETURN sample_id;
END; $$
LANGUAGE 'plpgsql'
SECURITY DEFINER
SET search_path = public, pg_temp;

REVOKE ALL PRIVILEGES ON FUNCTION insert_sample_p(
  input_mesasge VARCHAR
) FROM public;

GRANT EXECUTE ON FUNCTION insert_sample_p(
  input_message VARCHAR
) TO sample_application;
Running Flyway on a Local Database
Now that we have a set of migrations, let’s try to use Flyway to run them on a local database.
There are several ways to download and run Flyway. For this example we are going to use a Docker image that has Flyway setup and configured on it. We will also be using a Docker image to create a PostgreSQL database and save all the files to the data/ folder. To run both of these conatiners in conjunction we will need to have Docker and Docker Compose. Steps for downloading those can be found here and here.* If you do not have an account on Docker Hub, go ahead and create one as we will be using it later.
*While the Docker CLI does now have support for running Docker Compose with docker compose ..., it is still experimental and I have not been able to get it to work consistently so I recommend downloading Docker Compose and running the commands with docker-compose ....
Next, create a file named docker-compose.yml in the same location as the sql/ folder and add the following content:
docker-compose.yml:
version: '2.1'

services:
  postgres:
    image: postgres:10-alpine
    restart: always
    environment:
      - POSTGRES_USER=postgres
      - POSTGRES_PASSWORD=password
      - POSTGRES_DB=aurora_serverless_flyway_db_local
    ports:
      - 5432:5432
    volumes:
      - "./data:/var/lib/postgresql/data"
    healthcheck:
      test: ["CMD", "pg_isready", "-q", "-U", "postgres"]
      interval: 5s
      timeout: 1s
      retries: 10

  flyway:
    image: flyway/flyway:7-alpine
    depends_on:
      postgres:
        condition: service_healthy
    volumes:
      - "./sql:/flyway/sql"
    command: [
      "-url=jdbc:postgresql://host.docker.internal:5432/aurora_serverless_flyway_db_local",
      "-user=postgres",
      "-password=password",
      "-locations=filesystem:./sql",
      "-placeholders.DATABASE_NAME=aurora_serverless_flyway_db_local",
      "-placeholders.READ_ONLY_PASSWORD=password",
      "-placeholders.SAMPLE_APPLICATION_PASSWORD=password",
      "migrate"
    ]
Once the file is created, run docker-compose up to start the services. This will first create a PostgreSQL server with a database aurora_serverless_flyway_db_local. Once that is up and running, a container with the Flyway image will start and run the migrate command on that database. Note the connection string uses host.docker.internal which resolves to the internal IP address used by the host. In other words, host.docker.internal will use our machine’s localhost. We also provide the placeholders for our migrations, DATABASE_NAME, READ_ONLY_PASSWORD, and SAMPLE_APPLICATION_PASSWORD. Because this is just a local database that we are using to test out our migrations, we can just use the password password. If everything worked OK, you should see logs stating that your versions were migrated to the public schema. If not, use ctrl+c to kill the process and double check your migrations and docker-compose.yml file.
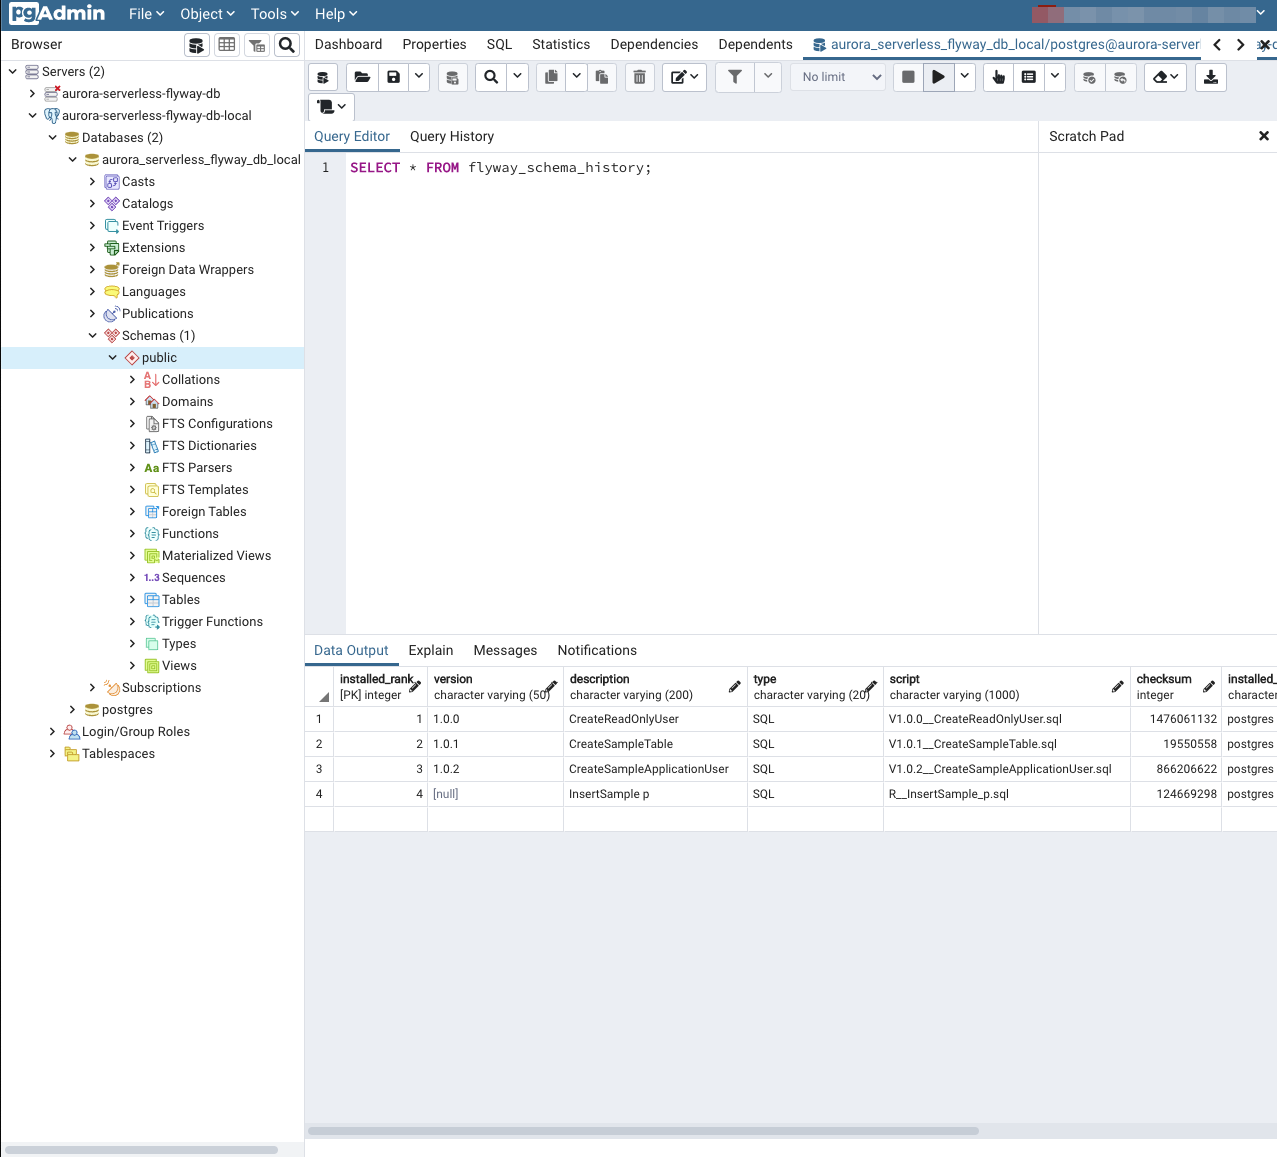
Assuming the docker-compose up command was successful and is still running, we should be able to use pgAdmin to connect to our local database. Open pgAdmin and create a new server connection in the same way we created the connection to our Aurora Serverless Database in the previous section. Use whatever name you like (I used aurora-serverless-flyway-db-local). The connection host will still be localhost. Make sure you kill your bastion host SSH tunnel if you didn’t do so earlier, or else the connection will attempt to be established to our Aurora Serverless Database. The User and Password will be postgres and password respectively. Once your connection is established, expand Databases > aurora_serverless_flyway_db_local > Schemas and you should see the schema public. If you right-click this, you can select Query Tool to open a query editor window. Enter the query SELECT * FROM flyway_schema_history; and click the Execute button that looks like a play symbol. This should return a table with each of the migrations that we just applied.
You can do more exploring in the public schema sections like Functions and Tables to see that our migrations were successfully applied. To stop the database use ctrl+c in the terminal that is running docker-compose up. All of the database changes will persist and are stored in the data/ folder. If you want to start from a clean database you can simply remove that folder and run docker-compose up again.
Running Flyway on your Aurora Serverless Database
So we know how to create our Aurora Serverless Database, we know how to establish a connection to that database using an SSH tunnel trough a bastion host, and we know how to create migrations and run them with Flyway on a local database. So how about we put these together to run our migrations on our Aurora Serverless Database!
- In a terminal run the
sshcommand to establish the SSH tunnel through our bastion host.-
ssh -i ~/key-files/bastion-host-key.pem -L "5432:<aurora_serverless_db_endpoint>:5432" "ecs-user@<bastion_host_endpoint>"
-
- In another terminal, run the Flyway
Infocommand with the following options from the same location as thesql/folder. The only changes from the options in thedocker-compose.ymlfile should be the database name to match the Initial database name for your Aurora Serverless Database, user and password options forsqladmin, and actual password values for the placeholders.-
# Docker style
docker run --rm -it -v "${PWD}/sql:/flyway/sql" flyway/flyway:7-alpine \
  -url=jdbc:postgresql://host.docker.internal:5432/aurora_serverless_flyway_db \
  -user=sqladmin \
  -password=<your_sqladmin_password> \
  -locations=filesystem:./sql \
  -placeholders.DATABASE_NAME=aurora_serverless_flyway_db \
  -placeholders.READ_ONLY_PASSWORD=<some_secure_password> \
  -placeholders.SAMPLE_APPLICATION_PASSWORD=<some_secure_password> \
  info

# From binary assuming it is in your PATH
flyway \
  -url=jdbc:postgresql://host.docker.internal:5432/aurora_serverless_flyway_db \
  -user=sqladmin \
  -password=<your_sqladmin_password> \
  -locations=filesystem:./sql \
  -placeholders.DATABASE_NAME=aurora_serverless_flyway_db \
  -placeholders.READ_ONLY_PASSWORD=<some_secure_password> \
  -placeholders.SAMPLE_APPLICATION_PASSWORD=<some_secure_password> \
  info
-
If all goes well, you should see something like the following showing that your migrations are pending.
Flyway Community Edition 7.9.1 by Redgate
Database: jdbc:postgresql://host.docker.internal:5432/aurora_serverless_flyway_db (PostgreSQL 10.14)
Schema version: << Empty Schema >>

+------------+---------+-----------------------------+------+--------------+---------+
| Category   | Version | Description                 | Type | Installed On | State   |
+------------+---------+-----------------------------+------+--------------+---------+
| Versioned  | 1.0.0   | CreateReadOnlyUser          | SQL  |              | Pending |
| Versioned  | 1.0.1   | CreateSampleTable           | SQL  |              | Pending |
| Versioned  | 1.0.2   | CreateSampleApplicationUser | SQL  |              | Pending |
| Repeatable |         | InsertSample p              | SQL  |              | Pending |
+------------+---------+-----------------------------+------+--------------+---------+
Now run a new command with the same options you just did except use migrate instead of info for the final command. This should apply all of our migrations to the database. If you reopen your connection in pgAdmin, you should be able to see the tables and stored procs were created on the Aurora Serverless Database in the same way that they were applied to the local database. Running info again should show that each migration has an Installed On value and a State value of Success.
Flyway Community Edition 7.9.1 by Redgate
Database: jdbc:postgresql://host.docker.internal:5432/aurora_serverless_flyway_db (PostgreSQL 10.14)
Schema version: << Empty Schema >>

+------------+---------+-----------------------------+------+--------------+---------+
| Category   | Version | Description                 | Type | Installed On | State   |
+------------+---------+-----------------------------+------+--------------+---------+
| Versioned  | 1.0.0   | CreateReadOnlyUser          | SQL  | ------------ | Success |
| Versioned  | 1.0.1   | CreateSampleTable           | SQL  | ------------ | Success |
| Versioned  | 1.0.2   | CreateSampleApplicationUser | SQL  | ------------ | Success |
| Repeatable |         | InsertSample p              | SQL  | ------------ | Success |
+------------+---------+-----------------------------+------+--------------+---------+
Congratulations! You just ran a set of Flyway migrations on an Aurora Serverless Database. With these skills you should be able to better manage your database schemas and quickly and easily make adjustments. In the next and final section, we will create an automated process for running database migrations from SQL code in a GitHub repository by using a Standalone AWS Fargate Task.